How to Mirror the backup data to an off-site location
One of the many ways that you can use Backup for Workgroups to achieve
offsite storage is to Mirror your backup data to a second location. This second hard drive can be located either on or offsite.
Read this page when you want to backup the computers in your office and store the immediate backups at the office and
then mirror the backup data to an off-site location. In other words, this is for you if you want to backup your
servers locally and make a copy of the local backup data at an off-site location.
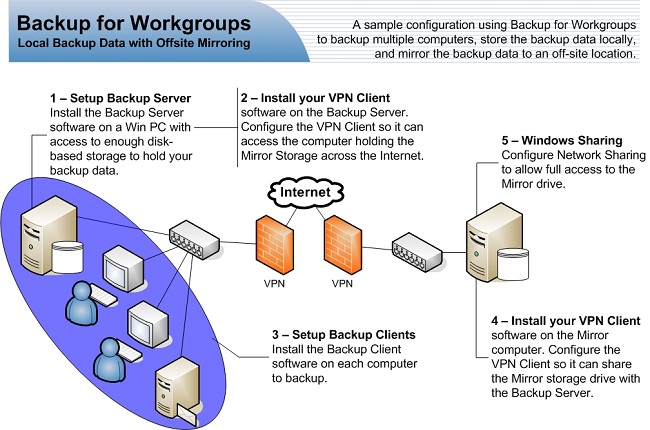
The backup data can be Mirrored over the Internet using a standard Windows networking connection. You can
enter the Mirror path as either \\ComputerName\SharePoint\FolderName or as the IP address \\192.168.X.Y.
Please note that you must use a UNC path such as (\\ComputerName\SharePoint\FolderName) to access the Mirror storage
device. Do not use a mapped network drive letter because Windows will not map drive letters to network shares
for services, but will allow services to use the UNC paths. Also, the account that the Backup for Workgroups
service is running under must have the rights to access the share point on the storage device.
The first instance of Mirroring will be a "baseline" mirror, so the whole
"Backup Storage" will be copied to the Mirror location. This can take some time
depending upon the size of your backup data and the speed of the
Internet connection.
After this first time, the Mirror process is incremental (just like the Client computer backups are), so the
incremental transfer time should be shorter than the baseline time. However, just because the Mirror process is
incremental does not guarantee that the transfer time is shorter. It also depends on the type of data that is being backed up and Mirrored.
During the Client backup process, Backup for Workgroups will backup up any file if it has changed, including
database files. So if you have a 10 GB SQL database file that changes every day, there will always be a new 10 GB
file sent to the Backup Server that will in turn be sent to the Mirror.
The benefit of performing the backup locally and then mirroring the results is that the backup runs at the speed
of your internal network – which is commonly anywhere from 10 to 100 times faster than backing up over the Internet.
Another benefit is that when you need to perform a restore – that process also enjoys the speed of the local network
as well, keeping your downtime to a minimum.
Follow along with these steps to set this up:
- Select a computer on your internal network that you would like to act as the
Backup Server. This
computer should needs to have access to enough disk-based storage to hold your backup data. Note, this disk-based
storage is local to your internal network. In other words, it is not off-site. For example, select a
computer on your internal network that has a large internal hard drive, USB drive, or access to a NAS device attached
to your internal network.
- Download the Backup for Workgroups (BFW) trial software and install the
Backup Server software on the computer you have
identified in Step #1 above. When you install the Backup Server, you will be asked where you want to store the backup data.
You should specify a disk-based storage location that has enough free disk space to hold your backup data. We recommend
storing the backup data on a dedicated hard drive or storage location that is not on the same drive location as the
Backup Server computer’s Operating System or on a drive that already holds critical data. When you store the backup data
on a different hard disk than the hard drive that holds the OS, you ensure separation between the data being backed
up and the storage of the backup data. In other words, if the Backup
Server has it’s OS on the C:\ drive, store the backup
data on a different, physical hard drive.
- Now that your Backup Server is installed, you can configure the accounts that your Backup Clients will use on the
Backup Server.
The BFW Backup Server needs to have an account for each computer that you want to backup so the
Backup Server can keep track of the backup
data for each individual computer that you are backing up. Note that you can assign any name to the accounts
corresponding to the computers that you are including in the backup process. Some users find it is convenient to
use the Windows username for each computer when creating the accounts in the
Backup Server. Other users find it easier to
keep track of the accounts by using the computer names as the account names. You are free to choose any name you want
that makes it easy for you. Just remember, whatever name you specify for the account at the
Backup Server will also be
used by the Backup Client.
- Go to the individual computers that you want to backup and install the Backup Client software on each computer.
During the installation and setup process, you will need to enter the name of the computer that is running the
Backup Server
software and you will need to enter the account name and password that was established for this computer when you
created the account at the Backup Server.
- You are ready to start the backup process. By default, the Backup Client creates a backup set to backup all
local hard drives at 11pm for servers and at 12 noon for workstations. If you do not want to wait for this
automatic backup to run, you can always go to that particular computer, run the Backup Client software and manually
run a backup with the Backup Now button. You may also add backup sets and modify backup sets on an individual basis,
tailored for the computer and its user. We recommend that you do not change the All Local Drives backup set because it
performs a backup of the entire computer which is necessary should you need to perform a complete computer disaster
recovery.
- At this point, you have one or several computers performing backups and their backup data is being sent to one or
several storage devices that are local to your office network. Now you are ready to setup
your mirror. Here’s the equipment you will need to setup an off-site
mirror:
- At the off-site location, you need a Windows computer that has access
to enough storage to hold a complete copy of your backup storage. For example, if you have 500GB of
backup storage at your office Backup Server, then you
need the same amount of storage for the mirror at the off-site location.
- Let’s talk about setting up the Windows computer and mirror storage at the off-site location. The computer
at the off-site location needs to have a Windows network sharepoint accessible to the computer running the
Backup Server at your
office. Here’s the instructions you need to follow to setup this Windows network sharepoint:
- Go to the off-site location computer.
- The first thing you need to do is to allow your mirror storage location to be "shared." This sharing
process allows the end point (the mirror storage) to accept data from the
Backup Server. And, unfortunately, this process
is different for each version of Windows, so you will need to follow the instructions that go along with your OS version.
i. Windows
XP Users = Go to My Computer and navigate to the drive and directory location
corresponding to the location that you want to use to store the mirror. Right
click on this location and select "Sharing and Security." In the ringed area
of the dialog called "Network sharing and security" check/tick "Share this
folder on the network" and check/tick "Allow network users to change my files."
Press OK.
ii. Windows
2003 Users = Go to My Computer and navigate to the drive and directory location
corresponding to the location that you want to use to store the mirror. Right
click on this location and select "Sharing and Security." On the Properties
dialog, go to the Sharing tabbed page and select "Share this folder." Press the
Permissions button and you need to grant full control to the Windows user that
corresponds to the Windows account that the Backup for Workgroups Service runs under. If you look
at the list of user names and do not see the name of the account that
corresponds to the Windows account that the Backup for Workgroups Service runs under, press the
Add button, then press the Advanced button, and then the Find Now button. Now
you can see a list of users and you can scroll through it to highlight the
appropriate entry. Press OK twice and this user name now appears in the user
name list on the original Properties dialog. Keeping focus on that user name,
you can check/tick the box to grant this user "Full Control" and press OK to
save these settings.
iii. Windows
7 and Vista Users = Go to "Computer" and navigate to the drive and directory location
corresponding to the location that you want to use to store the mirror. Right
click on this location and select "Share." At the File Sharing dialog, the
currently logged in user is displayed by default and you can add additional
users by typing in the user name directly or use the down arrow to select the
Find… option. If you need to use the Find… option, you immediately press the
Advanced button, then press Find Now and a list of users appears. Select the
appropriate user name and press OK to add the name to the File Sharing dialog.
Select the desired user name and under the heading "Permission Level" choose the
option "Co-owner." This is Vista’s equivalent to "Full Rights." Press the
Share button to apply your changes.
- At this point, you have the Mirror computer configured to accept incoming data and store the incoming data on a
storage location that is being shared. The next step is to make this share visible to the
Backup Server computer. When sharing across the Internet, you should use a VPN solution to protect your data. You will need to
setup a VPN link between the office network and the off-site network that allows standard Windows file sharing to
cross between the two networks. Every VPN vendor has a different method of setting up VPN connections. Refer to the
VPN manufacturer’s documentation for information about how to set this up.
- Go to the computer running the Backup Server, run Backup for Workgroups and go to the Storage panel. On the lower half of
the Storage panel - which is the Mirror Group, press the Add button. Please note that there are two Add buttons on the Storage panel – make
sure you press the Add button that appears in the Mirror Group section, which is the lower half of this dialog.
- At the Add Mirror Storage Device dialog, you need to enter the name of the computer at the off-site location and
the sharepoint that you created in the steps above. Enter this information in UNC format, which looks like
" \\offsite-computer-name\sharepoint\foldername ". You can use the Browse button or type the information in
directly. Press OK.
- After adding the Mirror storage device, the Backup Server will display the Mirror location in the lower half of the Storage
panel. The Backup Server will check access to the Mirror location. If it can access the Mirror location, you will
see a green disk icon in front of the named Mirror location. If the icon is red or the comment section displays
an error message, you need to take a corrective action. The most common cause of problems with Mirroring to
network shares is rights. The Backup Server accesses the off-site Mirror location using the credentials of the Windows
account that the DRM Service runs under. If you need to review the credentials of the Windows account that is
running the DRM Service, follow these steps:
- At the computer running the Backup Server, Right click on My Computer and select Manage.
- At the Computer Management windows, expand "Services and Application" and then highlight "Services".
- The right hand panel will now show all of the installed services. Scroll the panel on the right until you
see the service named "Backup for Workgroups Service".
- Right click on the service and select Properties.
- Switch the tab dialog to the "Log On" tab.
- The Windows account that is running the Backup for Workgroups Service is displayed in the box next to
"This account" and its
associated password is displayed with a preset number of dots, which may not correspond to the number of characters
in the actual password.
This Windows account needs to have full access to the sharepoint at the off-site storage device. If this Windows
account does not have full access rights, either select a different Windows account that does have full access rights
or go to the off-site location and add this Windows account to the share that you established to hold the mirror data.
|