How to restore individual Exchange emails without taking Exchange offline
Backup for Workgroups (BFW) is a client-server, disk-based, Windows backup
solution designed to centralize the storage of all your backup data while
storing your backup data locally so you can restore your data as fast as
possible.
Don't rely on cloud-based backup solutions, especially when it comes to
protecting your Exchange Server. Exchange Server mailbox stores tend to be
larger than what you can backup over the Internet in a 24-hour period. As
a result, cloud-based Exchange backups tend to be incomplete or out-of-date very
quickly. And, to restore from your cloud-provider takes even longer to get back
- creating more downtime than necessary.
When you backup locally, using BFW, you are taking advantage of the speed of
your own network to both backup and restore your data, and minimizing downtime.
And, when you are backing up your Exchange Server with BFW and the Exchange
Message Restore Addon, you can restore individual emails without taking your
Exchange Server offline. BFW Version 7 supports Exchange 2010, 2007, and 2003.
What do I need to do to backup my Exchange Server using BFW?
Select a computer that is going to act as your Backup Server. This
can be your Exchange Server or any other computer on your network. For the
purposes of our example, we are going to assume that you want to setup
Backup for Workgroups to just backup your Exchange Server.
Make sure your Exchange Server has access to enough free disk space to
hold your backup data. We recommend that your backup storage space be three
times (3X) the size of the data you are going to backup. This allows
for revisions of your backup data. If you do not have enough free disk
space, we suggest that you add an internal or external hard drive to the
Exchange Server computer.
Download and run the Backup for Workgroups Setup program on your
Exchange Server. When you run the Setup program, select the option
indicating that you want to Backup this computer only. The Setup
program will ask you where you want to store your backup data; specify the
location identified in Step 2. Once you have specified this
information, the Setup program will complete the installation.
BFW defaults to backing up your entire Exchange Server at 11pm using the
All Local Drives backup set. You may change this time if you want, but we
recommend that you always have an All Local Drives backup set to use so you
can perform a disaster recovery (all data recovery) if needed.
The first backup performed is called a "Baseline Backup" and takes the
most time, because there is no pre-existing backup data. All
subsequent backups are incremental and only backup the files that change, so
they are much faster than running a first-time or baseline backup.
BFW maintains 25 revisions of your Exchange Message Stores by default.
You can change this revision setting to reduce the amount of storage space
consumed by backup revisions using the Tools>Preferences>Revisions dialog.
Each backup of your Exchange Message Store is a complete backup of the
Message Store for 2 reasons: (1) a complete Mailbox Store backup is needed
if you should have a need to restore your Exchange Server, such as a failed
hard drive, and (2) the Exchange Message Restore extracts messages from
revisions of your backups.
Show me how to restore individual Exchange
email messages?
It is easy to restore individual Exchange emails using Backup for Workgroups
and the Exchange Message Restore Addon. Because you cannot
try-this-before-you-buy-it (the Exchange Message Restore Addon license is
required before you can perform the full restoration process), you can:
Go to the Exchange Server, run Backup for Workgroups, go to Restore ->
Exchange Message Restore.
Select the date in the past when the email existed. BFW will pull a copy of that version of the Exchange mailbox store
from the Backup Server. Using that backup copy, BFW creates a temporary mailbox store in a temp folder
so that your production mailbox store is not altered.
Select the Exchange mailbox / the email user account that held the
email. Backup for Workgroups displays the folder view of that users
account in a view similar to Outlook.
Select the email messages you want to restore. You can select individual
messages and or folders of email messages.
Specify the email server and the email address to send the restored
email to.
Begin the restore.
The restored email message will be sent to the inbox of the specified
recipient. Note that when you use the Backup for Workgroups Exchange
Message Restore add-on, the production Exchange Server is never interrupted
nor modified. Also the entire time for the restore is minutes.
Video - Restoring Exchange Email with Backup for Workgroups
Walk-thru the screen shots of restoring Exchange email with the Exchange Message
Restore add-on
Install BFW on your Exchange Server. Allow BFW to perform backups
of your Exchange Server over time, so you have backup data to pull from.
Go to the Exchange Server computer. At the Exchange Server, run
Backup for Workgroups. Notice that the Exchange Message... button
is present when using BFW in evaluation/trial mode, but you can only restore
messages once you have purchased an EMR license.
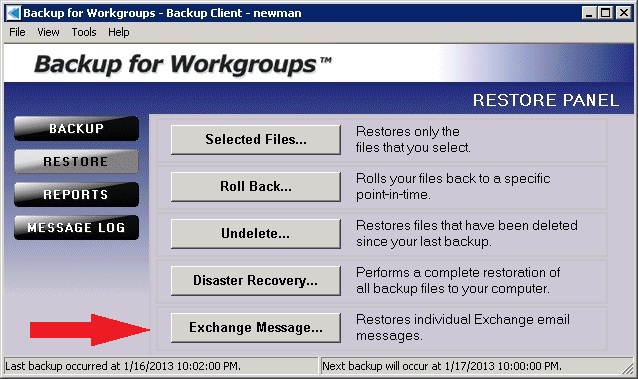
On the Restore panel, press the “Exchange
Message” button.
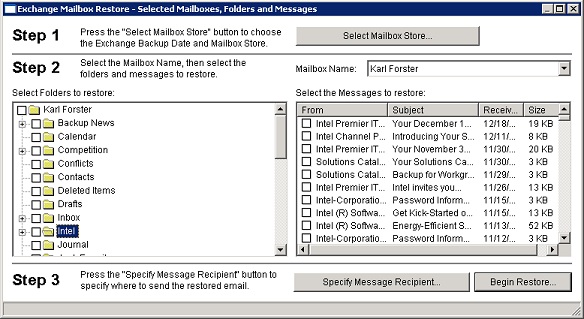
The Exchange Mailbox Restore panel is divided into three (3) areas in
which you perform a step in each. In the top portion of this dialog,
you perform Step 1. Let's proceed through the 3 Steps on the Exchange
Mailbox Restore panel in order.
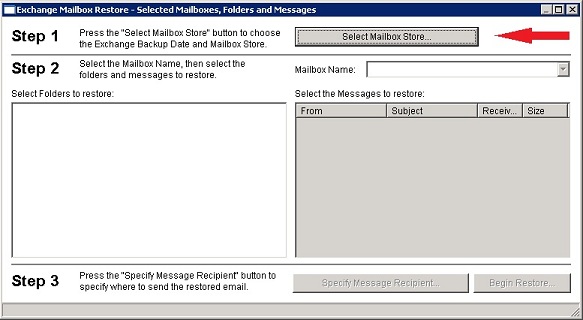
Step 1 - Press the "Select Mailbox Store" button. This is where you
are going to select the appropriate Mailbox Store, by backup date, from
which you want mail "restored from."
You will see a list of mailbox stores that were defined in Exchange Server
along with recent backup dates for each store. Select a date before the
email was deleted and then select the Exchange Mailbox Store that held that
particular message. Private Stores hold email for individual users.
The Private store contains the list of individual email accounts and the
email messages for those accounts - both inbound and outbound mail.
Public Stores hold email that is not associated with any individual and
Public Stores hold the data that is shared across your Exchange users.
Note - If Outlook was configured to store users' email in LOCAL .PST files,
their email MAY NOT exist at the Exchange Private Store; in this case, you
need to focus your efforts on restoring the LOCAL .PST on that particular
Backup Client. For example, in Outlook, Personal Folders are usually stored
LOCALLY, at the Client computer, inside a .PST file. But, email that is
stored under your Active Directory Account Name is stored at the Exchange
Server.
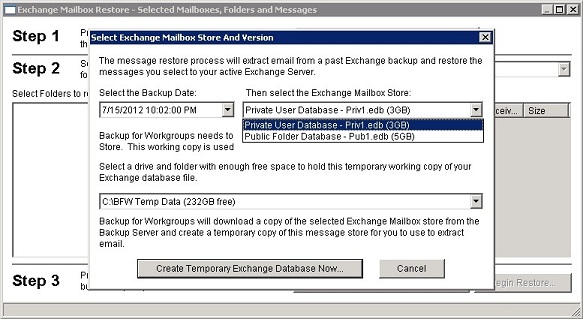
In our example, we want to restore a message from a Private Store that a
user deleted from their Outlook email client. They deleted this email
message on July 16th, so we are going to use the backup data from July 15th
to "pull the email from." Note, we can do this because their Exchange
Server is configured to store Private email at the server.
The list of backup dates is limited to the number
of revisions you have set in the Tools -> Preferences -> Revisions.
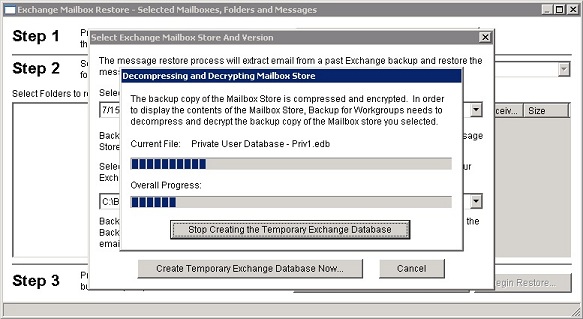
BFW needs to create a temporary copy of the mailbox store that you have
selected. You will need enough free disk space at the Exchange Server to
hold the temporary copy of the mailbox store you have selected, so BFW
can display it's contents and extract email messages. Once you have selected
a location for your temporary working copy of the Exchange data, press the
"Create Temporary Exchange Database Now" button.
Backup for Workgroups pulls a copy of the mailbox store that you
selected from the Backup Server and constructs a temporary, working copy of
this mailbox store at the location you had specified above. Typically, BFW needs
several minutes to construct the temporary working copy of the Exchange
mailbox store. The larger the mailbox store, the more time needed,
so give this a few minutes to complete. Generally this process will
take about 2 minutes per GB of Exchange data.
The restore process reads the backup copy of your mailboxes and
displays the contents of the user accounts / folders and messages. You can
see the Folders on the left, and the messages within the highlighted
folder, on the right.
If you
choose to restore email from a private message store, the list of Mailbox
Accounts is displayed. In our example, the Mailbox Name shows us that
we are looking at Karl Forster's email. If you want to look at a
different email user account, use the drop-list to select another
account/user. If you choose to restore email from a public
store, the list of public folders is displayed on the left. Since public
folders are not associated with accounts, the account name list is not
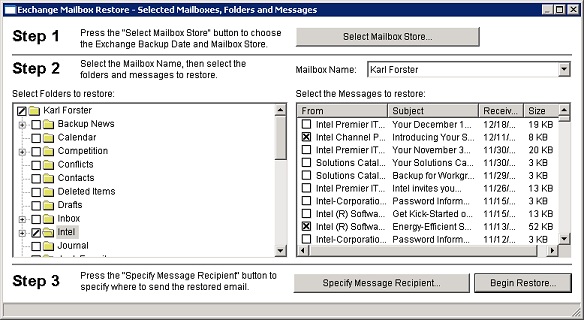
displayed. Use the dialog on the right-hand side to select the
messages that you need to restore. In our example below, we are going to restore
2 email messages, as indicated by the checkmarks.
Once you have selected the email messages you want to restore, you need
to tell Backup for Workgroups where to send the restored email. To do
so, press the button labeled "Specify Message Recipient" at the
bottom of the screen in the Step 3 section. You will be presented with
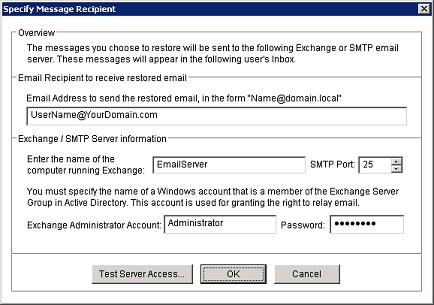
the Specify Message Recipient dialog.
Backup for Workgroups sends the restored email to a user's Inbox. Use
the Specify Message Recipient dialog to specify the name of the computer
running your Exchange Server. Normally you would send the
email to your Exchange Server, but in the event that your Exchange Server is
not operating normally, you can send the
restored email to another email server that supports the SMTP protocol.
The restored email will be sent to your Exchange Server using SMTP, so you will need
to provide login information to your Exchange Server for it to accept the
SMTP email. You need to specify an account that has administrative
rights or an account that is a member of the Exchange Servers group.
If your Exchange Server requires SSL/TLS, you can either use the SSL port which
is 465 or set the port to 25 and Backup for Workgroups will switch to SSL/TLS
automatically if the Exchange Server states that is what it requires.
And finally, specify an account that you want to send the restored
email to. This is the address of someone who wants to receive the
restored email.
Again, the restored email will appear in their Inbox and it will look like
new, unread email.
Press OK to save your changes.
After selecting the messages to restore and specifying who to send the
restored messages to, you are ready to start the restore process. Press the
Begin Restore button.
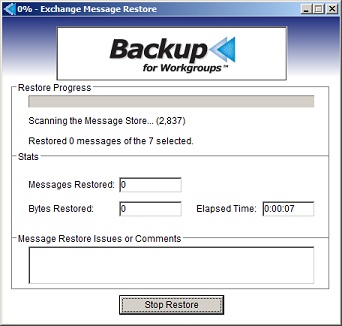
Backup for Workgroups will scan through the message store and find the
messages you have selected. Due to the method that Exchange uses to
store the messages in the message store, Backup for Workgroups has to
linearly scan through the messages to find them. As a result, the time
to perform the restore is based on how many messages are stored in the
message store. This may take several minutes to find the messages in
the message store. Please allow a few minutes for this process to run.
When the messages are restored, the progress screen will close.
The restored messages should appear in the inbox of the email address that
you specified.
What does Backup for Workgroups cost?
If you would like to backup one Exchange Server and activate the Exchange
Message Restore (EMR) Addon, you need to purchase one (1) Backup Client license
for $199 and one (1) EMR Addon for $149, which is a total of $348.
If you would like to see more pricing details, visit our
Price Chart.
Everyday, thousands of corporations, non-profits, and
Government agencies use Backup for Workgroups Backup Software to backup
their Windows Servers! You can too!